Tire Basics
Tire Types
American Classic offers two types of clincher tires: tube-type and Tubeless Ready.
Tube-Type
Tube-Type tires have been the most common, and most recognized, for years. They have a hook bead, require a properly sized inner tube, and mount to rims with hook beads. The inner tube maintains inflation pressure while holding the tire against the rim to keep it safely in place.
American Classic Tube-Type tires follow current global E.T.R.T.O. standards for clincher tires and clincher rims. They require a rim that includes a hook bead. For more information on tire and rim compatibility, see our Tire – Rim Compatibility page.

Tubeless Ready
Tubeless Ready tires are similar to modern car and motorcycle tires. They are designed to be run without an inner tube and secure to the rim using specific beads on the tire and rim. Modern Tubeless Ready systems utilize a combination of a tubeless specific rim and rim tape, an air-tight casing and bead on the tire, a tubeless valve stem, and sealant. Our Tubeless Ready tires can be used on traditional clincher rims. However, they must be used along with a properly sized inner tube.
American Classic Tubeless Ready tires follow current global E.T.R.T.O. standards for clincher tires and clincher rims. For tubeless use, they require a tubeless rim that meets those standards. They can also be used on non-tubeless clincher rims as long as the rim meets the above-mentioned standards, and they are used with a properly sized inner tube. For more information on tire and rim compatibility, see our Tire – Rim Compatibility page.
Tire Construction
Folding Tires
Bicycle clincher tires traditionally had steel wire beads to hold the shape of the rim and were unable to fold beyond a figure-eight without permanent tire damage. Folding bead tires feature a wound aramid bead that is about 100g lighter than a wire bead and can be folded on itself without damage. This allows the tire to be lighter and fit in smaller packages for shipping.
TPI (Threads Per Inch)
TPI, or threads per inch, references the casing of the tire and affects how the tire rides. The number refers to the quantity of threads that are be found in an inch of the material that is used in the tire’s casing. Folding bicycle tires are commonly available in 60 TPI or 120 TPI, though higher and lower TPI numbers can be found. The higher the TPI, the smaller the gaps between the threads which means less rubber is required in that casing. This yields a lighter, more supple tire that is better able to conform to the road or trail surface. Lower TPI tires have larger gaps between the threads requiring more rubber in the casing. This yields a heavier tire that is less responsive to the terrain. However, this also provides a less expensive tire that can be slightly more durable.
Tire Sizes
The bicycle industry tends to cling to tradition, and tires sizes are a particular place where the nomenclature can introduce confusion. Tire sizes like 700c, 29”, and 650b come from an era where many countries had their own way of measuring tires. Today there are standards, like E.T.R.T.O., which provide a system that is followed globally. American Classic uses both the traditional and the global standards sizes on each tire.
The E.T.R.T.O. standards are broken into two numbers: the width and the bead seat diameter. An example is 25-622 which refers to a 25mm wide tire designed for a rim that has a 622mm bead seat diameter.

With regard to rim sizes, 700c and 29” are both based on a 622mm BSD rim. Thus, the diameter of a 29” mountain bike rim should be the same as a 700c road or gravel rim. And both 27.5” and 650b are based on a 584mm BSD rim. Thus, the diameter of a 27.5” mountain bike rim should be the same as a 650b gravel or city bike rim. The bicycle industry tends to use 700c, or 650b, when referring to narrower tires and 29”, or 27.5”, when referring to larger volume tires. This is due to tradition.
Tire width is strongly dependent on the rim that the tire is mounted on. American Classic designs our tires using design size standards specified by E.T.R.T.O.. In the illustrations below, the ‘design size’ rim width is the larger numbers shown in the center of the rim's width range. A tire is mounted to the designated design size rim, inflated, let sit for 24 hours, and then inflated again. At that point the tire will match the listed size. In line with this, a 32mm Torchbearer tire will measure 32mm in width when mounted on a clincher rim that has an internal width of 21mm after 24 hours of inflation. Mounting this same tire on a narrower rim will result in a narrow tire. And mounting this same tire on a wider rim will result in wider tire width.
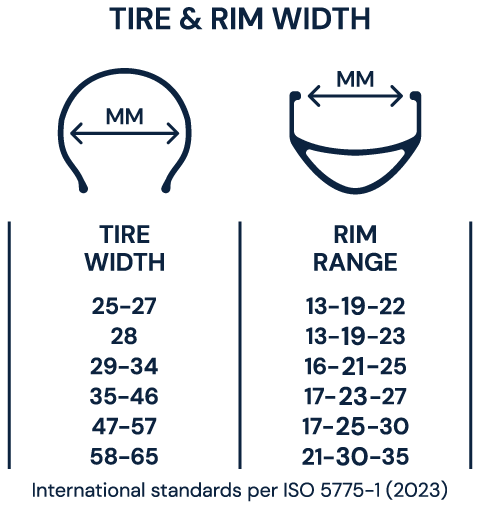
To determine your rim’s width, measure the gap shown in the illustrations below.

For more information on tire and rim compatibility, see our Tire-Rim Compatibility page.
For a thorough explanation of tire sizes of the past and why we call them what we do today see Sheldon Brown's Tire Sizing Systems page.
Tire Pressure
Maximum tire pressure is limited by the shape and strength of rim sidewalls and the tire bead’s fit, strength, and resistance to roll or blow off the rim. American Classic tires use size specific bead materials and construction to minimize weight and maximize tubeless performance. These beads allow us to quote higher maximum tubeless air pressures than some of the competition. The listed pressures are the maximum recommended rideable air pressures for given tire sizes — you will likely find that a lower air pressure than quoted gives you the best ride quality and lowest rolling resistance.
| Max Air Pressure | ||
|
Tire Section Width (mm) |
On Hookbead Rim |
On Hookless Rim (psi/bar/kpa) |
| TC/TT | TSS - As set by ISO-TC31-SC10 | |
|
25 |
100/6.89/689 |
72.5/5.0/500 |
|
28 |
85/5.86/586 |
72.5/5.0/500 |
|
30 |
80/5.52/552 |
65.3/4.5/450 |
|
32 |
75/5.17/517 |
65.3/4.5/450 |
|
35 |
70/4.83/483 |
58.0/4.0/400 |
|
40 |
55/3.79/379 |
50.8/3.5/350 |
|
45 |
50/3.45/345 |
43.5/3.0/300 |
|
47 |
50/3.45/345 |
43.5/3.0/300 |
|
50 |
50/3.45/345 |
43.5/3.0/300 |
|
57 |
50/3.45/345 |
36.3/2.5/250 |
|
61 |
50/3.45/345 |
36.3/2.5/250 |
|
64 |
50/3.45/345 |
36.3/2.5/250 |
Note that the casing of both bicycle tires and inner tubes are porous and thinner than a car or motorcycle tire. This results in their losing air pressure at a quicker rate than tires made for those other transportation categories. We recommend riders check their tires before each ride to maintain proper riding pressure.
Also note that hookless rims may have a lower maximum air pressure than hook bead clincher rims. Never inflate your tire beyond the lowest of the maximum pressures provided by the rim and tire. For example, if your tire has a 72.5 PSI maximum and your rim has a maximum of 65 PSI, the actual maximum for the system is 65 PSI.
For more information on hookless tire and rim compatibility, see our Tire-Rim Compatibility page.
Installing Clincher Tires
For decades clincher tire installation was taught as starting at the valve and finishing opposite the valve. In many cases this worked due to looser tolerances at the time. The tighter tolerances of the new global E.T.R.T.O. and ISO standards will make that method for installation very difficult. The valve, whether attached to an inner tube or already mounted in a tubeless rim, will prevent the tire’s bead from dropping into the center channel of the rim. This increases the distance from the tire bead at the valve to the top of the rim on the opposite side.
By starting opposite the valve, the tire’s bead can drop into the rim’s center channel. This reduces the distance from that bead to the furthest point on the rim near the valve. This also reduces the effort required to pull the tire’s bead up and over the last section of rim as you finish the installation.
The following illustration compares the distance from where the tire’s bead starts (at the left) and finishes (at the right) during installation. The goal is reducing the gap between the tire’s bead and the black line which represents the top of the rim. The shorter the gap the less effort is required to get the tire up and over the rim. Note that the green line is closest to the black line. The other lines are further away from the black line. Using those starting positions will require more effort to pull the tire up and over the rim to finish the installation.

For detailed steps on clincher tire installation, see our Tire Installation Manual.